top of page

SURMOD
1930 Hudson Super 8
Pinion and Differential Rebuild
The white arrow shows the pinion assembly. With the differential to the right and the driveshaft to the left.

Once the driveshaft was removed the universal flange was removed by loosening the large castle nut. The nut, even though it was secured by a cotter pin was only a little more than hand tight and that made me wonder why it was loose and what was going on inside.
Once the universal companion flange was removed I pulled the seal and if you look closely you can see the stain on the bottom of the seal showing that the seal had been leaking fluid for some time.

On the right are all the components that make up the pinion assembly. What I have marked with an "S" is the seal that will be replaced. Also the "B" bearing will be replaced.
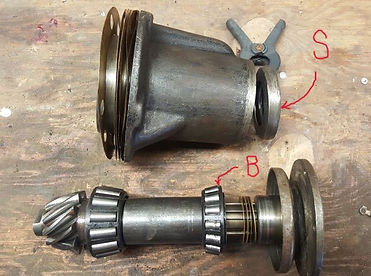
The picture on the right shows just how bad the bearing was in the pinion assembly. Needless to say the race was in the same condition and it too was replaced. I took the pinion housing and the race to a machine shop to have it pressed in.

The larger bearing and it's race at the other end of the pinion housing were in very good condition so they were left alone and now the entire pinion is in excellent condition.
Since I was into the rear end this far I decided to pull the back plate off and have a look inside. This step is what they call "opening a can of worms"
I decided it was a good time to check the backlash on the differential gears since the pinion was in such rough shape I felt it was a good idea to thoroughly check the entire assembly. The gas tank is very close to the back of the differential and you can't even get a good look at it, let alone take any measurements. So it was time to remove the guts of the differential and mount it on an engine stand so I could inspect it clearly and then set the backlash.
This proved to be a very wise decision. As the pictures below show. I cleaned off the ring gear with brake cleaner and then painted 4 gears in a row and then opposite to them 180 degrees I painted 4 more gears with gear marking compound. I then went about the procedure of setting the backlash by adjusting the adjusting nuts on both sides of the differential cases. I became puzzled when I could set it up so paint was wearing off one set of painted gears but not the other set on the opposite side. After some time of scratching my head I decided to check the ring gear for trueness. The allowable tolerance is around .002th.-.004th. out of true using a dial indicator on the side of the gear and rotating it. My ring gear was out .40th. So something was very wrong. All nuts were tight and nothing else was loose.

In the pictures above you can see where the right side case has cracked in a couple different places.
In this picture you can see the crack on the inside of the right case, after I disassembled the differential assembly and it was the same at all four points where the studs went through the case.
The picture on the right shows how the pin that holds the spider gears, isn't fitting tightly all around. There were gaps where I have the "X" as well as where I have the "G". I never did figure out how it got that way even after I disassembled the cases. I can only assume that whoever was in there the last time over tightened the case studs, perhaps to try and get things lined up in the picture on the right and over tightened the nuts so much that it cracked the case. This was enough to put the ring gear out of alignment.


It was obvious at this point that I needed to replace at least the right side case. But being over 90 years old, the likelihood of finding one was not an easy task.
I got lucky and found not only a right case but I found 4 complete differentials with the leaf springs attached. They were in Northern Alberta about 16 hours drive away. I decided to buy 2 complete sets. Speculating that between the two I should be able to put together something that would work.


After pulling one of the two gear assembly and pinion assembly out of the differential housing, I inspected it visually as best I could and decided to install it just as it was. The backlash seemed to be within tolerance specs, and there was no sign of the pinion seal leaking so I thought I would give it a try just as it is after cleaning it out thoroughly.


I'm using 600W Axle and Transmission lubricant. Specifically designed for these old cars. However it is as thick as molasses and getting it into the filler hole is a real challenge because of the close proximity of the fuel tank and the exhaust pipe. I found a formed 90 degree heater hose on a shelf at a local auto parts store one day and used them for my heater hoses as they go through the firewall on my 1948 Chrysler. I liked them so much I bought extras. In fits perfectly into the filler hole and the 90 degree turn allows me to put a long funnel in the other end. So I can fill the differential from above the axle assembly. It's convenient to have the rear right wheel removed for this procedure. The process is quite time consuming. Fill the funnel to the top and walk away. it takes about 15 minutes for that much to drain into the differential. So to get the proper amount in the differential takes a fair amount of time.
bottom of page